
If you want to master how to store meal prep containers properly, you need to know that storage is just as important as the recipe itself.
In fact, proper storage helps keep your food fresh, safe, and ready to enjoy all week long.
With the right methods, your hard work won’t go to waste — and your lunch will taste just as good on Friday as it did on Monday.
Need more meal prep tips? Visit our Weekly Meal Prep category for practical guides.
Why Proper Storage of Meal Prep Containers Matters
Storing your meals the right way helps preserve taste, texture, and food safety.
Moreover, it prevents bacteria growth and reduces unnecessary food waste.
Key benefits of proper meal prep container storage:
-
Maintains freshness longer
-
Reduces food spoilage
-
Saves time during the week
-
Improves food safety
-
Keeps the fridge clean and organized
As a result, you save both money and effort while enjoying better meals.
Choose the Right Meal Prep Containers
Not all containers are created equal.
Therefore, to store meal prep containers properly, you should invest in those that are:
-
Airtight and leak-proof
-
BPA-free and microwave-safe
-
Stackable for easy storage
-
Transparent for quick identification
-
Suitable for freezer or fridge use
Looking for reliable options? You can find it on Amazon.
How to Store Meal Prep Containers Properly – Step-by-Step
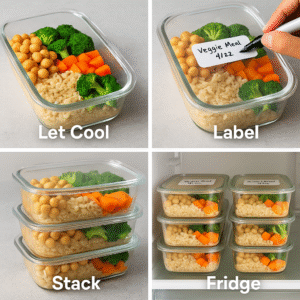
Step 1: Let Meals Cool Before Storing
Placing hot food directly into the fridge increases condensation and may raise internal temperatures.
Because of this, let dishes cool for 15–30 minutes before sealing.
Step 2: Label and Date
Always label containers with the name of the meal and the date prepared.
This way, you can track freshness and avoid confusion.
Step 3: Store by Type
Group meals by type — breakfast, lunch, snacks — so you can grab and go quickly.
In addition, you’ll save time each day by knowing exactly where things are.
Step 4: Organize by Shelf
Use top shelves for ready-to-eat meals, middle for reheatable items, and bottom for raw or heavier containers.
Consequently, this layout supports food safety and efficiency.
Step 5: Keep Sauces Separate
Store sauces or dressings in small containers.
That way, your meals stay fresh and don’t get soggy.
Fridge vs. Freezer: What’s Best for Storing Meal Prep Containers?
Fridge
-
Ideal for meals consumed within 3–4 days
-
Quicker to reheat
-
No need to defrost
Freezer
-
Great for longer-term storage (up to 2 months)
-
Best for soups, stews, grains, and baked meals
-
However, remember to leave space for expansion in containers
Cleaning and Maintenance Tips for Meal Prep Containers
-
Wash containers with warm, soapy water or in the dishwasher
-
Avoid scrubbing with harsh pads to prevent damage
-
Dry thoroughly before reusing
-
Store lids separately to avoid warping
As a result, your containers will last longer and remain safe for food use.
Conclusion
Now that you know how to store meal prep containers properly, you can ensure your meals stay fresh, safe, and delicious all week long.
By following these tips, solo cooks can build a routine that saves time, reduces waste, and brings peace of mind.
Share this guide with a friend who’s just getting started with meal prep.